Friday, January 29, 2010

PC Running Slow?

(Portions taken from"Optimize Windows Vista for better performance", http://windows.microsoft.com/en-US/windows-vista/Optimize-Windows-Vista-for-better-performance)

No matter how fast computers might be when they are new, they all seem to get slower over time. That speedy PC that you bought last year might not feel like it's running so fast anymore after you install a dozen programs, load it with antispyware and antivirus tools, and download untold amounts of junk from the Internet. The slowdown might happen so gradually you hardly notice it, until one day you’re trying to open a program and wonder, "What happened to my poor PC?" Whatever the cause, there are a lot of ways to help speed up Windows and make your PC work better. Here are some tips to help you optimize Windows for faster performance:


  • Delete programs you never use


  • Limit how many programs load at startup


  • Defragment your hard drive


  • Clean up your hard disk


  • Run fewer programs at the same time


  • Turn off visual effects


  • Try restarting if there's a problem


  • Add more memory


  • Check for viruses and spyware


  • Check your computer’s speed


  • Check for updates from the manufacturer


  • Don’t settle for slow


Delete programs you never use
Many PC manufacturers pack their new computers with programs you didn’t order and might not want. These often include trial editions of programs that companies hope you will try, find useful, and then pay to upgrade to full versions. If you decide you don’t want them, keeping the software on your computer might slow it down by using precious memory, disk space, and processing power.
It’s a good idea to uninstall all the programs you don’t plan to use. This should include both manufacturer-installed software and software you installed yourself but don’t want anymore—especially utility programs designed to help manage and tune your computer’s hardware and software. Utility programs such as virus scanners, disk cleaners, and backup tools often run automatically at startup, quietly running in the background where you can’t see them. Many people have no idea they are even running. (if you have many icons down by the clock in the lower right corner of your screen then you may want to read further)


Even if your PC is older, it might contain manufacturer-installed programs that you never noticed or have since forgotten about. It’s never too late to remove these and get rid of the clutter and wasted system resources. Maybe you thought you might use the software someday, but never did. Uninstall it and see if your PC runs faster.
You can uninstall a program from your computer if you no longer use it or if you want to free up space on your hard disk. You can use Programs and Features to uninstall programs or to change the program's configuration by adding or removing certain options. NOTE: Once you uninstall a program it is permanently removed. You must have the original CD to re-install.


  1. Open Programs and Features by clicking the Start button , clicking Control Panel, clicking Programs, and then clicking Programs and Features.

  2. Select a program, and then click Uninstall.


Limit how many programs load at startup
Many programs are designed to load automatically when Windows starts. Software manufacturers often set their programs to open in the background, where you can’t see them running, so they’ll open right away when you click their icons. That's helpful for programs you use a lot, but for programs you rarely or never use, this wastes precious memory and slows down the time it takes Windows to finish loading.


Decide for yourself if you want a program to load at startup.
But how can you tell what programs load automatically at startup? Sometimes this is obvious, because the program will add an icon to the notification area on the taskbar (the bottom right corner near the clock), where you can see it running.

Look there and see if there are any programs running that you don’t want to load automatically. Position your mouse over each icon to see the program name. Be sure to click the Show hidden icons button so you don’t miss any icons.
Where Have All The Menus Gone?


One of the challenges of "clicking" with technology is keeping up with the changes. Every year either a new handheld gadget, desktop PC, laptop, or netbook comes out and with those come new software applications.

For example, if you purchased a new computer in the last year and requested Microsoft Office to come pre-installed (or if you purchased the software separately) you quickly realize that the latest version out there, Office 2007, has changed significantly. For those new to Office, it is a combination of programs: Word, Excel, PowerPoint, and depending on your version, sometimes it comes with Outlook, Publisher and Access.

Word 2007 is your word processor for doing basic typing of letters, reports, and also adding graphics and photos so you can create flyers, advertisements, brochures, and newsletters.

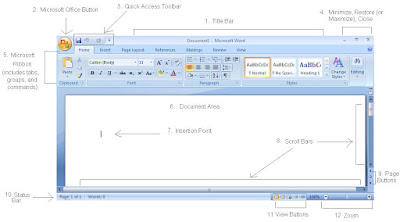
Many of the computer lessons I give, whether in a classroom or one-on-one, involve questions about this latest version of Word. If you were using the older version of Word (Word 2003) then you became comfortable using the File menu to open, save and print your documents. But first look at Word 2007 and sure enough the File menu is gone! It's been replaced with what's called the Ribbon Bar.


To open a file using Word 2007:
  1. Click the Office Button in the top left corner of your screen (circular button looks like the Microsoft Office icon)
  2. Click Open then navigate to where your files are saved and double-click the file to open it.
To save a file using Word 2007:
  1. Click the Office Button in the top left corner of your screen.
  2. Click Save if you want to save the file in the new Word 2007 format (most computers that don't have the new Word program installed will not be able to read this format).
  3. Click Save As if you want to save the file in a compatible Word format so that any computer running Word can read the file.
  4. Select Word Document 97-2003 to save the file in the compatible format.

To print a file using Word 2007:

  1. Click the Office Button in the top left corner of your screen.
  2. Click Print then select print from the menu. Make sure your printer is selected.

To register for a class or one-on-one lesson to learn the 2007 version of Microsoft Office, check out The PC Teacher website: www.thepcteacher.com

Regards,

Betsy Sabatini Coyne

The PC Teacher

"Helping You Click With Technology"


Wednesday, January 6, 2010

Wires, Cables and Cords Oh My !

I love it when I get a new tech gadget. I can't wait to read the manual and figure out how to use it! I suppose that's why I'm in this line of business. I love to figure out how to use electronics and computer equipment. These days there's a lot to keep up with. Did you get a new tech gadget as a gift over the holidays? Maybe a new digital camera, camcorder, Flip Video camera or iPOD. Possibly a new smartphone or PDA (such as iPhone, BlackBerry or Palm) has replaced your old phone. Or even a new flatscreen t.v. or video game console such as Wii, XBox or Play Station. Not to mention the extra cords that come with desktop computers, laptops and netbooks.


What do you do with the cords once everything is set up? Even though I enjoy figuring out how to use my new tech gadgest, part of the challenge for me is organizing the cords so that they store safely under the desk or behind the cabinet. Another challenge is remembering where I put all the extra cords when it comes time to charge, transfer or synchronize.

A good solution for keeping all your tech gadget cords close is to use a charging station. Usually a nice looking wood box that comes equipped with a powerstrip built inside. All your charger powercords are stored nicely and ready to use when it comes time to charge.


Another good solution I learned from my friend, Jean Marie Herron, owner of POSSE Partners LLC, (Professional Organizing Solutions Serving Everyone), is to label the cords as soon as I take them out of the packaging.

POSSE Partners, LLCJM with papers Jean Marie Herron is the expert I turned to when I needed to organize the equipment in my classroom and office. Jean Marie says, " As soon as you get a new electronic gadget, label the cords with either a professional label maker or even simple white mailing labels from a store such as Staples. Then give the item a "home" so you always know where to find your power chargers, camera, camcorder, and iPod USB cords as well as BlackBerry and Palm synchronizing cords. (See photo).


For tidying up cords underneath a desk, screw or hook a power strip underneath your desktop away from foot traffic so you can run your cords up and out of the way into a surge protector.

Utilizing twist ties, rubber bands, wire ties (in every man's tool box) or fancier products, many which are sold in places such as The Container Store (http://www.containerstore.com/search/result.htm?query=cordsare) are simple ways to corral cords. My favorite is the Velcro Cable Ties. They look like a mini-belt and can be adjusted to fit most office needs."


If I label the cords as soon as they come out of the package, I'm more likely to find the right cord when I need to charge, update, synchronize or upload.


For more information on Jean Marie Herron and her inspirational organizing ideas, check out her web page: http://www.possepartnersllc.com/ or search for POSSE Partners, LLC on Facebook and become a fan.

For more information on how to use your USB cords to update, synchronize and upload, check out my website: http://www.thepcteacher.com/ or simply follow the tips online and become a fan on Facebook at: http://www.facebook.com/betsythepcteacher.


Betsy Sabatini Coyne


The PC Teacher