
What is Lightscribe Technology?
LightScribe Overview LightScribe is a disc-labeling technology that lets you laser-etch a label directly on your disc. Creating professional-looking discs is easy: burn your disc, flip the disc over, and then burn your label onto the disc. The same drive that burns your data, burns your label. A LightScribe-enabled DVD drive uses a laser to burn an image into the coating on the label side of a LightScribe disc. The LightScribe labeling system has no ink to smear, no paper to curl, and no sticky adhesive to cause problems.
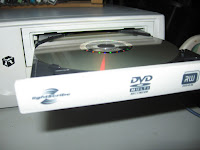
To create a LightScribe label, you need: 1. A LightScribe-enabled DVD drive in your computer or LightScribe-enabled DVD writer. LightScribe-enabled computers or writers typically have the LightScribe logo or the word "LightScribe" displayed on the drive tray or computer itself.
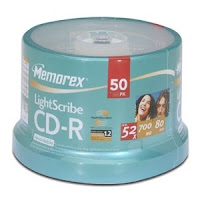
2. LightScribe-supported disc-labeling software. This is often included with your LightScribe-enabled computer or DVD writer. 3. Specially coated LightScribe CDs or DVDs (sold separately at major retail stores or online). LightScribe discs are identified by the LightScribe logo on the media package. Refer to http://www.lightscribe.com/ for more details on LightScribe.
Creating a LightScribe Label Burning a label with LightScribe is easy. To start, you need to run LightScribe-supported labeling software. The label software often can be launched as a separate application that is included with your CD or DVD burning application programs. Depending on the labeling software you use, you can create a label before or after you burn the disc content. NOTE: To burn a label, you must flip the disc over and place it label-side down in the drive tray.
The following step-by-step instructions will help you create your first simple LightScribe label using various LightScribe-supported labeling software. Refer to the documentation of each application for details on all of the available features.
Using Sonic Express Labeler to create a LightScribe Label Windows Platform
1. Click Start->All Programs->Sonic RecordNow!->Express Labeler. NOTE: You can also open the Express Labeler from within RecordNow! by clicking Label Disc.
2. Make sure that Disc Label is selected in Step 1: Select Project.
3. Click Disc Titles and then enter text for the Title and Subtitle.
4. Click Tracks to enter track titles. Click New and enter text for the information you want to include, and then click OK. You may have to select a different label template to display track titles.
5. Select a label template by clicking Layout and choosing a layout.
6. If desired, select a background by clicking Background. Select one of the provided backgrounds or click More to load up your own images to be used as the background.
7. When you are satisfied with the appearance of your label design, insert the LightScribe disc (label-side down) into the disc drive tray and then click Print.
8. From the Disc Label menu, select LightScribe 12cm Disc.
9. Select a Contrast Level and then click OK to begin burning the label. The estimated time to complete the label is displayed, along with a progress bar. You can continue to work on your computer while LightScribe is burning the label.
Using Roxio Easy Media Creator to create a LightScribe Label Windows Platform
1. Launch the Roxio Easy Media Creator disc labeling application. Click Start->All Programs->Roxio Easy Media Creator->Tools->Label Creator.
2. A simple title layout is shown by default. Double click on the Title and Data fields in the disc layout to enter a simple title and subtitle information.
3. If you want a different layout that allows for labeling the full area of the disc, click Select Style in the Edit Layout menu at the left of the screen. In the Select Style window, choose a style category from the left pane and select the style you want from the preview area. Ensure that the style covers the full area of the disc. 4. To use your own background, click Edit Background in the Edit Layout menu at the left of the screen. Check Use the following image as the background image option, click Browse..., select the image you want to load, and click OK.
5. If you want to add pictures to the label, click Add Image from the Add Object menu at the left of the screen. Select the picture you want to load and click OK. Pictures can be resized and positioned on the label design.
6. When you are satisfied with the appearance of your label design, insert the LightScribe disc (label-side down) into the disc drive tray and then click File->Print... from the menu at the top of the screen.
7. Select a Print quality level. In the Printer settings area, ensure that the printer selected is a LightScribe capable drive. Click OK. The estimated time to complete the label is displayed, along with a progress bar. You can continue to work on your computer while LightScribe is burning the label.
Frequently Asked Questions NOTE: Refer to www.lightscribe.com/support for a complete list of Frequently Asked Questions and answers.
What do I need to create a LightScribe label?
To create a LightScribe label, you need:
• A LightScribe-enabled DVD drive in your computer or LightScribe-enabled DVD writer. LightScribe-enabled computers or writers typically have the LightScribe logo or the word "LightScribe" displayed on the drive tray or computer itself.
• LightScribe-supported disc-labeling software. This is often included with your LightScribe-enabled computer or DVD writer
• LightScribe System Software. This is similar to a driver and is usually included with your LightScribe hardware. The latest update can be obtained from www.lightscribe.com/support.
• Specially coated LightScribe CDs or DVDs (sold separately at major retail stores or online). LightScribe discs are identified by the LightScribe logo on the media package.
How can I tell if I have a LightScribe enabled DVD writer or PC?
LightScribe-enabled writers or PCs should either have a LightScribe name or LightScribe logo on the drive tray cover or a LightScribe sticker affixed elsewhere.
How do I create a LightScribe Label?
After the data side is burned using any data burning software, the disc needs to be flipped and reinserted into the drive tray with the label side down. The LightScribe label is created separately using labeling software.
Where Can I buy LightScribe CDs and DVDs? In the U.S., customers can find LightScribe CD and DVD+R media at major consumer electronics stores, office supply stores, and online. LightScribe DVD-R media is available from HP in select retail stores. Refer to www.lightscribe.com/buy for updated information on where to obtain LightScribe media.
Betsy
The PC Teacher
www.thepcteacher.com
bcoyne@thepcteacher.com
No comments:
Post a Comment