Wednesday, October 5, 2011

How Do I Use my iPod and iPad with Multiple Computers?

This is probably one of the most frequently asked questions that I get after I set someone up with their iPod or iPad for the first time.  Months or even years after they've been enjoying their music and videos they get a new computer.   When you plug your iPod into a different computer from which it was originally synchronized, you get a warning message.  You see, by default, your device is set to "Automatically sync songs…," sometimes called automatic mode. To transfer music from multiple computers, your device must be set to "Manually manage music," sometimes referred to as manual mode.
Automatic Mode
When your device is set to automatic mode, iTunes automatically updates your device's music library whenever you connect it to your computer. iTunes transfers new songs you've added and erases songs you've removed. The first computer you connect your device to is its "home" computer. The music library from that computer is copied to your device. When you connect your device to a different computer, an alert box appears with this message:

If you want to delete the music library on your iPod and make the new computer its "home" computer, choose Erase and Sync. iTunes will delete all songs and playlists on your device, and then will copy the music library and playlists from the new home computer to your device.  (Warning: if the new computer doesn't have any songs in the iTunes library, then nothing will be synced and your iPod will be left empty)
If you want to move the iTunes Store purchases on your device to the new computer, choose "Transfer Purchases." The new computer must be set up with your iTunes Store account and authorized to play your iTunes Store purchases in order to transfer your iTunes Store purchases.
Manual Mode 
If you want to keep the music library on your device, but copy songs or playlists from the music library on the second computer, click Cancel when the dialog box appears, and then set your device to manual mode.
Change the device synchronization mode to manual mode in iTunes:
  1. Open iTunes.
  2. Select your device under Devices in the menu on the left-hand side of iTunes
  3. Click the Summary tab.
  4. Click "Manually manage music and videos" to enable that option. 
  5. Click OK in the resulting dialog box. 
  6. Click Apply.
It is normal for your device to take a few seconds to change from automatic mode to manual mode.
When in manual mode, to add songs or playlists, drag them from iTunes to the device icon in the sidebar. To remove songs or playlists, select them on the device in iTunes and press the delete key. You can also create playlists directly on the device.

Happy Clicking,
Betsy
The PC Teacher
bcoyne@thepcteacher.com

Monday, September 5, 2011

What to Type when you want to Show Emotion

An Emoticon is a sequence of ordinary characters you can find on your computer keyboard. Emoticons are used in e-mail, text, Facebook and other forms of communication using computers. The most popular emoticons are the smiling faces (smileys or smilies) that people use to say "don't take what I just wrote too seriously". If you don't see that it represents a smiling face, tip your head to the left and look at it again. :-) The colon represents the eyes, the dash represents the nose, and the right parenthesis represent the mouth.  Here's a list of other fun emoticons:

Happy emote: :) or :-)

Really happy emote: :D or :-D

Wink emote: ;) or ;-)

Happy eyes: ^_^

Laughing eyes: >:o

Cat smile: :3

Grumpy: >:-(

Sad: :( or :-(

Crying emote: :’(

Shocked emote: :o or :-o

Glasses emote: 8) or 8-)

Cool shades: 8-|

Rude: :p or :-p

Woot?!: O.o

Dork (ummmmm): -_-

Not amused (Duhhh) emote: :/ or :\

Devil emote: 3:)

Angel emote: O:)

Kiss emote: :-* or :*

Love emote: ♥

Pacman: :v

Robot: :|]

Happy Clicking,
Betsy
The PC Teacher
bcoyne@thepcteacher.com

Friday, June 24, 2011

Making Home Movies on your Computer

If you have a Windows computer, search for the program called, Windows Live Movie Maker. If you have a Mac, search for the program called, iMovie and follow the steps below for either program.


 Windows Live Movie Maker is a free program that comes with the Windows Live Essentials suite of programs available from Microsoft.  Visit this link for more information: http://explore.live.com/windows-live-movie-maker?os=mac  With Windows Live Movie Maker, you can turn your photos and videos into ovies. Add special effects, transitions, sound, and text to help tell your story. Sharing with friends and family is easy—whether on the web, or DVD.  DVD burning in Movie Maker is dependent on Windows DVD Maker, which is only available in Windows 7 and Vista.

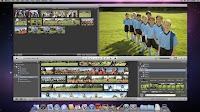
Chances are, you have a camcorder, a digital camera, or an iPhone — and maybe all three. That means one thing: You have a ton of great video. iMovie puts it all in one place and organizes it for you so your video is easy to browse and fun to watch. Just plug in your device, open iMovie, and start importing your video. It appears in your Event Library — the one place you’ll find everything you’ve ever recorded.  When you're ready, share your movie with iDVD (already installed on your Mac) and give to family and friends.

To make a movie with Windows Live Movie Maker, you'll need some photos and videos on your computer. You can import photos and videos from your digital camera, a flash memory card, DVDs, or your mobile phone.
Step 1: Connect a camera to your computer

Connect the camera to your computer by using a USB cable, and then turn on the camera.


Step 2: Start importing in Movie Maker

Click the Movie Maker button, and then click Import from device.
If the Photos and videos will be imported into Windows Live Photo Gallery message appears, click OK.


Step 3: Choose the device

Click the device you want to import photos and videos from, and then click Import.


Step 4: Import any new photos and video

On the New photos and videos were found page, click Import all new items now, type a name for all the photos and videos, and then click Import.


Step 5: Select the photos and videos to use in your movie
In Windows Live Photo Gallery, select the check box in the upper-left corner for each photo or video you want to use in your movie. On the Create tab, in the Share group, click Movie.
When the photos and videos appear in Movie Maker, you’re ready to start making your movie.


iMovie:
After you create a project,  you add video clips to it that you’ve already imported (transferred) from your camera to your computer.
All of your imported video appears in the Event Library. From there, you select specific video and add it to your project by dragging it to the project in the Project browser, which is your project workspace. As you add video and other elements to your project, they appear immediately in the Project browser, where you can edit them, rearrange them, delete them, and so on.
Add video to a project
  1. Open an existing project by double-clicking it (don’t click the project’s name directly) in the Project Library.
    If you don’t see the Project Library, click the Project Library button.

  2. In the Event Library, select an Event whose footage you want to add to your project.
    If you don’t see the Event Library, click the Event Library button, which is typically located in the lower-left corner of the iMovie window.

    You select an Event by clicking its name once. The Event footage appears in the Event browser to the right of the Event Library.

  3. In the Event browser, select a range of video frames or an entire video clip.
    To select an entire video clip, hold down the Shift key and click the clip once, so that it’s outlined in yellow.
    To select a portion of a clip (called a frame range), drag across any clip while you hold down the button on your mouse or trackpad. Selected frames are outlined in yellow.
  4. Drag your video selection to the Project browser.
    You drag by holding down the button on your mouse or trackpad as you move the selected clip to the Project browser. You can drag it anywhere: to the beginning or end of the project, or between clips you’ve already added. A vertical green line, along with a green Add (+) symbol, appears anywhere you can place the clip.
    The image below shows how the Project browser appears when you add your first video clip to a project.

    Video that’s been added to a project is marked along the bottom with an orange stripe in the Event browser, so that you can see at a glance which video you’ve used. You can add the same video to multiple projects, and you can use it more than once within a project.
Continue adding video in this way until you have all the video you want in your project. Next, you can enhance your project by adding music, photos, titles (text that appears onscreen, over your video), and more.

Follow the PC Teacher at www.thepcteacher.com for more information and help.  Have fun making your own home movies!

Friday, June 3, 2011

Automatically Backup Photos & Videos from your Camera, Phone or Handheld Gadget

Instant uploads from your camera wherever you are – that’s the power of the Eye-Fi Mobile X2 wireless memory card.
Automatically upload photos and videos to your iPhone, Android or tablet, whether you’re at the beach or on travel. Never run out of space with Endless Memory Mode. And that’s just the beginning! 

http://www.eye.fi/products/mobilex2
features
  • 8GB memory. Store up to 4,000 photos or 3h of video with top-notch Class 6 speed. Works just like your SDHC memory card!
  • Wireless. JPEG photos & videos sent through your Wi-Fi network thanks to built-in 802.11n speed.
  • The flexibility of anywhere. Not within Wi-Fi range? With Direct Mode, the Eye-Fi card can send JPEG photos & videos directly from your camera to your iPhone, iPad or Android device.
  • Endless. Get the only card that can free-up space for you after pictures are safely delivered. Never worry about running out of space again.
  • Automatic back-up. Wirelessly upload JPEG photos and videos to folders of your choice on your computer, or even directly into iPhoto for Macs.
  • Organized. Photos and videos can automatically land in date-based folders, so memories are organized effortlessly.
  • Compatible. No need to buy a new camera. Click here to see if your camera is compatible:
  • Effortless sharing. Wirelessly send your JPEG photos and videos to a popular website. Click the link above to see the complete list you can choose from, which includes Flickr, Facebook, Picasa, MobileMe, and YouTube.
  • Pick your pics. You can select which photos and videos are uploaded.
For more information and help with getting your pictures from camera to computer (or from phone to computer), check out the next PC Teacher class. www.thepcteacher.com

Happy clicking,
Betsy
The PC Teacher

What Are Hashtags ("#" Symbols)?

Used with Twitterthe # symbol, called a hashtag, is used to mark keywords or topics in a Tweet. It was created organically by Twitter users as a way to categorize messages.
Hashtags: helping you find interesting Tweets
  • People use the hashtag symbol # before relevant keywords in their Tweet to categorize those Tweets to show more easily in Twitter Search.
  • Clicking on a hashtagged word in any message shows you all other Tweets in that category.
  • Hashtags can occur anywhere in the Tweet.
  • Hashtagged words that become very popular are often Trending Topics.
Example: Below, @VegNews added the hashtag before the word "vegan" in their message. The word is now a link to search results for all Tweets containing "#vegan" in the message
Using hashtags
  • If Tweet with a hashtag on a public account, anyone who does a search for that hashtag may find your Tweet.
  • Don't #spam #with #hashtags. Don't over-tag a single Tweet. (Best practices recommend using no more than 3 hashtags per Tweet.)
  • Use hashtags only on Tweets relevant to the topic.
Some examples:
Business: #jobs, #business, #networking, #retail, #shoppers, #consumer, #sales, #economy, #technology, #luxury, #news, #internet, #mktg, #marketing, #webmarketing
Celebrities: #50cent, #aplusk, #bieber, #britneyspears, #charliesheen, #ladygaga, #obama, #oprah, #osama, #perezhilton, #ryanseacrest, #the_real_shaq, #theellenshow
Education: #edapp, #edtech, #education, #elearning, #lrnchat, #mlearning, #teachers
Environment.Justice: #humanrights, #poverty, #hunger, #aid, #sustainability, #health, #green, #eco, #earthtweet, #humantrafficking, #climate, #solar, #fairtrade
Social.Change: #socialgood, #cause, #volunteer, #4change, #giveback, #dogood, #crisiscommons
Entertainment: #bones, #dwts, #glee, #gossipgirl, #graysanatomy, #idol, #lrnchat, #mlearning, #sharktank, #survivor, #teachers, #theoffice, #thevoice, #xfactor

For more help with Twitter, check out the next PC Teacher class.  www.thepcteacher.com

Happy clicking,
Betsy
The PC Teacher

Wednesday, May 18, 2011

What Are All Those Updates?

If you use a Windows computer, you most likely have been prompted by a pop-up message to update your Adobe or your Java or your HP, Norton, AVG, McAffee, or a Windows Update. What does this all mean? Should you accept the updates? Read below for a tip:


I'm teaching a class on this: Monday, May 23, 9:30-11:00am, Ramsey. $25

In the meantime, here's a tip on how to adjust the Windows Update that automatically downloads or prompts you to restart:
By default Windows is set to automatically download and install updates. This saves you the trouble of checking for updates and installing them every now and then.
But the problem is that, once the updates are installed, windows needs to restart your computer (reboot).
Windows usually sets itself to reboot in 10 minutes, but it also gives you the option to postpone it. If you are working on something important, you can postpone the reboot.
If you have some important and unsaved work in progress and you have to leave your computer for a little while, and right at that moment, windows installed some updates and restarts, you lose all the in-progress work.
Here is a simple and easy adjustment to avoid the above annoyance.
1. From your Start Menu, type windows update in the search box, and hit enter.
2. Click the changes settings option at left.
3. Change the setting to download updates but let me choose whether to install them.
4. Click ok.
From this point forward, Windows won’t reboot without your permission, though it may still prompt you about installing the downloaded updates.
For more information, attend the "What Are All Those Updates?" class on 5/23/11 at The PC Teacher, Ramsey. http://www.thepcteacher.com/The_PC_Teacher/Events.html
Happy Clicking,

Betsy

The PC Teacher
http://www.thepcteacher.com/
bcoyne@thepcteacher.com


.

Thursday, May 5, 2011

Is Your Computer All A Twitter?

You may have heard someone say, "I read it on Twitter", "It all unfolded on Twitter", "I have Twitter on my phone", "They tweeted that...", "I follow her on Twitter" or "Follow my Twitter feed". But what exactly does it mean? Who should I follow and how ?


Twitter is a social networking service that allows you answer the question, "What's Happening?" by sending short messages up to 140 characters in length, called "tweets", to your friends, or "followers."  You don't have to be that bold though to use Twitter.  You may be the type of person who prefers to be a follower and read tweets including news and current events.  To do this, you search the Twitter site for a Twitter Feed that you want to follow.  A feed is a listing of posts that the person or business sends out in real time. 
 
Time Magazine recently published an article listing the top 140 Twitter Feeds.  People and things you can follow on Twitter include authors, technology sites, companies, new, businesses, celebrities, comedians, politicians, satire, pundits and commentators or shopping and coupons.

Want to follow Twitter feeds in the area of Technology?  Time Magazine listed these (the Twitter feed name is listed ... click the link to follow)
  1. Kara Swisher @karaswisher is one of the lead writers and co-founders behind the Wall Street Journal's online publication All Things Digital, one of the Internet's speediest sites for breaking technology and start-up news.
  2. Gina Trapani @ginatrapani is the founder of the quirky blog Lifehacker — a repository of time-saving tips for programming geeks — just wants to make your life easier.
  3. Beth Blecherman @techmama is the founder of TechMamas.com, a tech-meets-parenting site where Blecherman muses on the state of the digital world as well as her adventures in motherhood, making her one of the most respected women in the industry.
  4. Fred Wilson @fredwilson the New York City–based venture capitalist Fred Wilson promotes smart start-ups and informs his followers about new companies he thinks are doing interesting things. Want to follow Twitter feeds in the area of Technology? Time Magazine listed these (the Twitter feed name is listed ... click the link to follow)
Want to follow Celebrities? Time Magazine listed these (the Twitter feed name is listed ... click the link to follow)

  1. Ellen De Genereshttp://www.twitter.com/theellenshow
  2. Ashton Kutcher @aplusk
  3. Taylor Swift @taylorswift13
  4. Neil Patrick Harris @ActuallyNPH
Companies:
  1. Whole Foods @wholefoods
  2. Zappos @zappos
  3. Amazon MP3 @amazonmp3 Amazon's MP3 store has a selection to rival Apple's, and, in contrast to its discount-averse rival, launches frequent specials on its Twitter feed.
  4. Netflix @instant_netflix
  5. Starbucks @starbucks
Clicking,
 
Betsy
The PC Teacher
bcoyne@thepcteacher.com
http://www.thepcteacher.com/

Thursday, April 28, 2011

Where Did I Put That Password?

By Jean Marie Herron, Owner of POSSE Partners LLC. & Betsy Sabatini Coyne, Owner of The PC Teacher
It happens to us all, we jump on our computer to go to a particular website and it asks us for our password and we feel that anxiety settle in, "Shoot, where did I put that information? Is it still in my head, did I write it down somewhere?"
These small yet, vital pieces of information can lock us out of some crucial places we may want to get to. I know many clients who needed to get into financial sites for an ailing or recently past loved one only to realize that they didn't have the passwords/account numbers/pins and other important components like case sensitive ID names to sign on to their accounts.
There is no wrong or right way to "organize" your passwords. The most important thing to remember when determining a system that keeps track of your passwords is:

  • What are you comfortable with doing on a consistent basis?
  • What is the level of security that you need?
  • Are you a paper or electronic person?
  • Do you want anyone else to share in your confidentiality?
Here are some suggestions on how to organize your passwords but please keep in mind that one should focus on what would be an "Easy To Do For You, Rather Than That's A Cool Tool". Don't choose from the list below because it sounds like a good idea; choose it because it would be simple to incorporate into your daily routine.
PAPER IDEAS and LOW TECH SOLUTIONS
Create a binder and place A-Z tabs into the three-rings. Write your passwords in order alphabetically. You can always put this binder in a place where other family members can access it in case of an emergency. But, do label it something odd that a stranger wouldn't think to access such as, "Basketball Skills". Then only you and those you want to tell know that the Basketball Skills binder is really your secret code word for passwords.
When you write your passwords in the binder or notebook, write them in a 'secret' way. For example, if you know you use a password with 9 characters which begins with the letters BW and ends with the number 5, write this in your binder: BW******5. If the wrong person gets access to this binder, they won't know exactly what the password is set to. If you use capital letters in your password, write them this way as passwords are case sensitive.
Similarly, repurpose an address book or a Rolladex and use it for your passwords. Purchase a Password Directory from The Container Store for $8.99.
If you use something this small, tuck it away in a file close to your desk. Again, call the file something familiar to you such as, "Future Vacations" but someone snooping through your house wouldn't think to look at it.
Keep this tool handy so that you use it each time you create a new password/account. The old "Use It Or Lose It" will ring true if you do not put your solution in easy reach of your computer or financial information.
Since we are speaking about paper solutions, remember that paper can be lost by a person or even in a fire. Make sure you review, edit and update your passwords on a regular basis and once a year copy them and either put them in your safe or safe deposit box. You can also send a copy to a loved one for safe keeping. When you go on vacation, lock it up too.
ELECTRONIC IDEAS and HIGHER TECH SOLUTIONS
For many, going electronic is the way to go. No need to worry about a natural disaster if you store your passwords in the ever growing cloud we call online storage. With a little computer savvy you can access your passwords from anywhere.
Create an Excel spreadsheet or Word document and password protect it. Now you only have to remember one password.
Use your smart phone or computer's Contacts or Address Book section. For example, you can type in Amazon as a contact and then in the notes section you can enter your password and account information. Check for apps for your particular phone that would work for you. Ensure that you put a password on your phone so strangers can't steal your information if they get your cell phone.
If you synchronize your phone to your computer and then back-up your computer to an online back-up company, all your information is now online and off-site for you. You can also save your information to a flash drive or external hard drive and decide where to keep those. You can also send these files up to Evernote or DropBox.
Other websites that offer solutions to organize your passwords, make it easy to track, and provide "one-click" solutions are:
The first one, RoboForm comes highly recommended from my virtual assistant, Deb Davis, of A Virtual Click Away. As part of her job, she needs to remember hundreds of passwords for herself and her clients. As for the others, you will have to do some educated research for yourself although the ones I listed did come suggested to me from other professional organizers.
As a PO I am an advocate of utilizing both hard copy as well as electronic solutions and always having a back-up plan. So whatever you choose good luck and make sure someone you trust knows where this information lives...


WANT TO USE THIS ARTICLE IN YOUR EZINE OR WEBSITE? You can, as long as you include this complete blurb with it:
At POSSE Partners, LLC (Professional Organizing Solutions Serving Everyone) we cater to homeowners who want one-on-one help with their organizing endeavors whether it's their space, papers or time. Besides transferring these organizing skills to our clients, we also hold organizing classes called Clutter Corrals, have a monthly forum for supporting each other called POSSE's Pen and we also give organizing presentations as well. To learn more about the author and owner, Jean Marie Herron, and sign up for her free newsletter go to www.POSSEPartnersLLC.com.

Friday, April 22, 2011

Have You Tried Dropbox?


Dropbox is the easiest way to sync and share your files online and across computers. Any file you save to Dropbox also instantly saves to your computers, phones, and the Dropbox website. (source: www.dropbox.com) If you have multiple computers in the home, download the Dropbox application on each computer and start an account at no cost.  Dropbox gives you 2GB of space for free.  If you need to keep track of your kid's school projects or your documents from work, you will have plenty of space (even for some random photos as well!).   The next plan up on Dropbox is $9.99 per month for 50GB of space.
(source: download.cnet.com)

But wait, there's more!  Dropbox works just like any other folder on your computer, but with a few differences. Any files or folders inside Dropbox will get synchronized to Dropbox's servers and any other computer linked to your account. Green checkmarks will appear on top of your files to let you know that they're synced and up to date. All data is transferred over a secure connection (SSL) and encrypted before storage. Dropbox keeps track of every change made to any of its contents.

Do you use a mobile device such as the iPad, iPhone, Android or Blackberry?  You can download an app that gives you access to your Dropbox files.  You can open an Excel spreadsheet or Word document and work on it while you are out and about.  One example is DropDAV which is an application the works as a liaison between your Dropbox files on the internet and your hand-held device.  (http://dropdav.com/)  The cost is 30% of your Dropbox plan amount.  So if you are using the free Dropbox plan then your DropDAV is free as well!
Have fun in the "cloud"!

Happy clicking,
Betsy
The PC Teacher

Sunday, April 17, 2011

Excel to iPad and back again

Have you gotten the iPad yet?  It's a cool, cool gadget.   Many like it for personal use (music, videos, movies, games) but many are appreciating its size when it comes to keeping up with work on-the-go.

But if you use Excel or Word on your computer, how do you keep up with your documents and spreadsheets on the iPad?

Start by tapping the App Store on your iPad.  Search for the Numbers app (to work with Excel spreadsheets) and tap to buy. (the Numbers app costs $9.99 at the App Store).

Once the Numbers App is downloaded, then go back to your computer and email your spreadsheet to yourself.  You will need to open your Mail on your iPad in order to work further on the spreadsheet.

On your iPad, open Mail, open the email with the "address book" attachment  and double-tap it to open it. (the attachment will say .xls or .xlsx indicating it's a spreadsheet)

It will ask you in the upper right corner if you want to "Open in Numbers". Tap that to proceed.
You will see your spreadsheet. This is where some iPad techniques come into play. Use your fingers to zoom in
Double-tap on a cell to edit it. Then use your keyboard to enter more names and addresses.

To "save" stuff on an iPad, you will send it to either your iDisk (if you have that) or  iTunes.  To do this, tap on "My Spreadsheets" in the upper left corner. You will see 3 or 4 buttons at the bottom of the screen.  Tap the first button (looks like it has a curved arrow on it).  Then tap "Copy to iDisk" or "Copy to iTunes".
If you want to pick up with work on it at home, you can plug in your iPad to your computer, go to iTunes or your iDisk and continue work there.

For more information, group lessons or one-on-one training, check out my website: www.thepcteacher.com

Happy clicking,
Betsy
The PC Teacher

Wednesday, April 6, 2011

How to Save Cash, Ink and Paper when Printing

If you’re shocked by the costs your printer incurs then this information is for you. Learn how to reduce printing costs by making some simple and free tweaks to your printing routine and print settings.
Printing costs, especially if you have an inkjet printer, are astronomical.

You do have the option to save an article or document as a file, email it to yourself, and read it on your computer, tablet or smartphone screen.  But if you must print, think about adjusting your printer's output settings:
  1. To reduce the size of the print job, use the File menu or Print menu from which the program you're printing.  Use the print preview button to make sure you’re not printing blank pages at the end of the web site you’re about to print off. If you’re not using the print preview you’re just asking to end up with all sorts of extra pages out of the printer. When you preview you can see if the document will look the way you want on the page and you can also see if the last page will, for example, be nothing but the web site footer and an advertisement.
  2. Start shrinking your print size. Can you shrink to fit the page and still read it?   Adobe Acrobat, Microsoft Word, and most major document reading and editing applications support shrink to fit and scaling the page before printing.
  3. Switch to draft mode as the default setting. Depending on your printer the actual title will vary. Some companies call it “draft mode” others call it “toner saver”, “print saver”, “economy” and so on. Regardless of the name it’s a setting or series of settings that allow you to reduce how much ink and toner you're using. For simple things like articles and basic documents you’ll likely not even notice the difference. If you do notice it won’t likely decrease your ease of reading. What it will do is radically cut down on how much ink and toner you're using on the paper.
  4. Print only the selected text.  Before you print, use your mouse pointer to highlight the area on the screen you wish to print.  Then bring up your print window (usually File, Print in most programs) and choose the option to print the selection.  Selective printing is an aggressive approach where you edit prints before they are sent to your printer saving yourself a bundle in the process. A variety of solutions exist to help you conserve ink and toner by selectively printing.
  5. When printing from the web, PrintWhatYouLike.com is a great resource for on-the-fly web site editing. By either plugging in the URL to their web site or launching their bookmarklet—you can quickly and easily edit a site and pull out the content you don’t want. Want the article, a few of the how-to photos you might need to reference, and that’s it? Go ahead and click on (and delete or resize) all the elements you don’t need. You can adjust the font size, selectively edit, and otherwise reduce the footprint of the document. (source: www.howtogeek.com)
Happy Clicking,
Betsy
The PC Teacher
www.thepcteacher.com

Monday, April 4, 2011

Use Email to Text

Note: Sending an email is always free, but the person that receives the message will probably be charged for a text message according to their text messaging plan. Keep that in mind when using this.

Do you sometimes want to send out a quick text message but you are at your computer and can't use your phone? Maybe you are at work or in a location with a weak cell phone signal.  These instructions show you how to use your email account and get that message out using the SMS Gateway addresses shown below.  SMS, short for Short Message Service, similar to paging, SMS is a service for sending short text messages to mobile phones.
To get started enter the SMS Gateway address in the same way that you would with an email address, compose your message, and then click send.

In a short time your family, friends, or coworkers will have the new SMS show up as a text message on their mobile phone.


To use the SMS Gateway addresses shown here, substitute where it says "mobile-number" below with the 10 digit mobile phone number for the person you are sending a message to in front of the appropriate address (i.e. 2015551212@carrier.com).  Use the address where it says MMS to send a picture via text message.
Note: SMS Gateways shown here are for U.S. carriers only 

Alltel Wireless mobile-number@message.Alltel.com (SMS & MMS)
mobile-number@text.wireless.alltel.com (SMS) mobile-number@mms.alltel.net (MMS)
AT&T Wireless mobile-number@txt.att.net (SMS)
mobile-number@mms.att.net (MMS)
AT&T Mobility (formerly Cingular) mobile-number@cingularme.com
mobile-number@mobile.mycingular.com
Boost Mobile mobile-number@myboostmobile.com
Cricket mobile-number@sms.mycricket.com (SMS)
mobile-number@mms.mycricket.com (MMS)
Metro PCS mobile-number@mymetropcs.com
Sprint (PCS) mobile-number@messaging.sprintpcs.com SMS)
mobile-number@pm.sprint.com (MMS)
Sprint (Nextel) mobile-number@page.nextel.com (SMS)
mobile-number@messaging.nextel.com (Rich Messaging)
Straight Talk mobile-number@VTEXT.COM (SMS)
mobile-number@mypixmessages.com (MMS)
T-Mobile mobile-number@tmomail.net (MMS)
U.S. Cellular mobile-number@email.uscc.net (SMS)
mobile-number@mms.uscc.net (MMS)
Verizon mobile-number@vtext.com (SMS)
mobile-number@vzwpix.com (MMS)
Virgin Mobile mobile-number@vmobl.com (SMS)
mobile-number@vmpix.com (MMS

Sunday, March 27, 2011

Click & Drag? Not the only way...

Many people may know that if you're using a word processor program such as Microsoft Word, you need to select the text first before you can change the look of it. And many of those people have only been taught to select text using the Click & Drag method which can be frustrating especially if you text extends across multiple pages.


Here are some tips and tricks for selecting text using two different mouse pointers, the Selection Bar Pointer and the Text Pointer.


Selecting Text with the Selection Bar Pointer


In Word, place your mouse pointer in the left margin. Your mouse pointer should change to a white arrow and it points toward the right corner of your screen.


1. Single click- selects the entire line.


2. Single click and drag straight down-selects multiple lines


3. Double click-selects the paragraph


4. Triple click-selects the entire document


Selecting Text with the Text Pointer


In Word, when you float your mouse pointer in between the characters of any word in any paragraph in your document your mouse pointer displays the Text Pointer which resembles a capital letter I.


1. Single click-cursor flashes so you can type text


2. Click and drag-selects any amount of text


3. Double click-selects a word


4. Ctrl and click-selects the sentence


5. Triple click-selects the paragraph


As always,
Happy Clicking,

Betsy
The PC Teacher
http://www.thepcteacher.com/
bcoyne@thepcteacher.com

Saturday, March 26, 2011

Keep Your PC Up To Date

 
On of the time consuming tasks about Windows computers is updating software. While Microsoft does a good job keeping the operating system updated, other software inevitably falls through the cracks. If you look on your Windows screen down in the bottom right corner, called the system tray, where the clock is located, you may see some of the icons shown here.


 For example, the orange icon with the cup of coffee represents a program called Java which works in the background when you are browsing internet pages. Many people are not keeping their Java software up to date. As a result, bugs in the older versions are a very popular way for malicious software to install itself. If you are prompted that there is a Java update available, take it but read each message and make sure as you install the upate it doesn't give you any new programs (such as Open Office) or tooblars if you don't want them.


To keep your operating system up to date, there's an easy, free way to help keep your PC safer and running smoothly. It's called Windows Update. All you have to do is turn it on, and you'll get the latest security and other important updates from Microsoft automatically.


Click the Start button, click All Programs, and then click Windows Update or go to http://update.microsoft.com


Windows Update helps keep your PC safer—and your software current—by fetching the latest security and feature updates from Microsoft via the Internet.


In Windows 7, Windows Update is now part of Action Center, which makes updating your PC even more convenient. To check for updates, just click the Action Center icon (resembles a tiny white flag on a pole) on the taskbar.


To watch a video about the Action Center in Windows 7, Click here http://windows.microsoft.com/en-US/windows7/products/features/action-center

Monday, March 21, 2011

Sending a Vacation Reply Email from Outlook

It's great sending and receiving emails, but when you leave for vacation and you may not have access to your email account wouldn't it be great if you could have an automatic reply sent for you?

In Outlook you set rules and using a template can have an Out of Office reply or "I'm on vacation" reply sent for you.


Create an an email which is used as the reply template


  1. Open a new Outlook message.
  2. In the message body, type whatever information you'd like to appear in your custom reply.
  3. On the Office menu, click Save As.
  4. In the File name box, enter a name for your reply template.
  5. In the Save as type box, click Outlook template, and then click Save.
  6. Make note of where your template is saved.
  7. Close, the email, and when prompted to save, click No.

Create a rule to send an automatic reply

  • Click on the Tools menu, select Rules and Alerts.
  • In the Rules and Alerts dialog box, click the New Rule button.
  • In the Rules Wizard under Start from a blank rule, click Check messages when they arrive, and then click Next.
  • Under Which condition(s) do you want to check?, click to select the Sent Only To Me check box or any other check box that you want, and then click Next.
  • Under What do you want to do with the message, click to select the Reply using a specific template check box.
  • Edit the Rule Description, click the underlined phrase a specific template.
  • In the Select A Reply Template dialog box, click the template that you saved previously and then click Open.
  • Complete the Rules Wizard instructions, click Finish, and then click OK
  • Give the rule a name (for example, vacation reply)
  • Check off that the rule is in use when you go on vacation and anyone who sends you an email will be sent your automatic reply.
Happy clicking,

Betsy
The PC Teacher
www.thepcteacher.com

Friday, February 4, 2011

How to Use Google Site command

If you do a lot of "Googling" these days you may want to know how to use the Google Site command.  When using the Site command, Google gives you a list of search results all from the same website.  Here's how it works:

  1. From the Google Search box, type your search keyword(s). (For example, as shown above, if you're looking for apple pie recipes, type apple pie).
  2. After the last keyword in your search, type a space then type the word site followed by a colon (i.e. apple pie site:)
  3. After the colon (no spaces please!), type the website from which you would like all the results. (i.e. apple pie site:www.foodnetwork.com)
  4. Press Enter or Return on the keyboard or click Google Search.
  5. The list of results is shown.  Notice in green under each result the website you specified in step 3 above is part of every link.
This is a efficient way of searching the internet.  Try your own example using a different website and search keywords.  Leave your comments below on your findings!

As always, happy clicking,

Betsy
The PC Teacher
www.thepcteacher.com

Thursday, January 27, 2011

How To Use Labels in Gmail

  1. Gmail is Google Mail.
  2. If you don't have a Gmail account, click here then click on Create Account in the lower right corner of the screen.
  3. Gmail refers to labels like folders.  They are a place where you can organize and store emails so that you can refer to them in the future.
  4. To create a new label, look for the Create New Label link on the left side of the Gmail screen.
  5. You may need to click 'More' to see the link.
  6. The New Label window appears.  Type a label name and click OK. (for example, if you want to keep all of your store coupon emails in one "folder" then call the label: store coupons.
  7. The new label will be displayed on the left side of the screen.
  8. To apply the label to an email, from your Inbox, click the checkbox next to the email.
  9. Click the Move To button at the top of the screen.
  10. Select the label from the list and the email is moved to that "folder".  To find the email, click on the label name on the left side of the screen.
Happy clicking,
Betsy
The PC Teacher
bcoyne@thepcteacher.com
For a class on Google and Gmail, check out The PC Teacher calendar of events.

    Saturday, January 8, 2011

    2011

    New Year.  New technology goals.  What are your technology goals for 2011?  I taught many people during 2010 who had set a goal related to the computer.  There are beginner computer users who set a goal of learning how to send and receive email, log on to a website, and understand what all the features are used for on their Dock (Mac users) or Start Menu (Windows users).  Some had decided to learn how to use their digital camera and then transfer the pictures to their computer.  Others had mastered the transfer but had the challenge of learning how to organize all of the pictures that had landed on their computer over the months or how to use their printer/scanner with the hopes of converting many of their developed pictures into scanned images.  I meet many people who are looking for a new job who quickly find that most of the job postings require a knowledge of Microsoft Office (Word, Excel, Powerpoint, Access and even Outlook).  And then there are all the technology extras.  Some want to learn how to attach a file to an email, open a PDF, save to a flash drive, tweet or post their status, communicate via Skype, start a website or even write their own blog.

    This year one of my tech goals is to blog at least once a week.  Why blog?  It is the easiest way to capture my technology tips in one place and archive them by date.  My blog is accessible from any computer with internet connection.  You can even search the blog for particular topics such as Word, Excel, Powerpoint, Google, Twitter, Facebook, iPhoto, Picasa, and more.  My blog entries will be short and sweet but filled with a specific technology tip.  A 'how-to' blog entry pertaining to a website or software program that you can follow along at your own pace.

    Stay tuned.

    As always, happy clicking,
    Betsy
    The PC Teacher
    bcoyne@thepcteacher.com